")
Use YouTube to make a written transcript. To create a GIF from a YouTube video: Select a video to watch on YouTube and find the URL at the top of your browser. To create a playlist on mobile: Click here for instructions explaining how to create new playlists using your iOS or Android mobile devices. To add a video to a playlist: If you're adding a video to a playlist while you're watching it, click the "Add to" icon below the video title and check the box next to the playlist to which you'd like to add it. If you want to add a video to a playlist right from your Playlists page, simply click "Add Video" and either paste in a video URL, choose a video from your uploads, or search for a video on YouTube. Once you find the video you want to add, select the "Add to" menu from that video and add it to the playlist. To add a video to your "Watch Later" playlist: Open the video on YouTube and click the "Add to" icon below the video title and check the box next to the playlist you'd like to add it to, just like you did in the previous step. YouTube is there for you. You can upload and watch 360-degree videos (live and pre-recorded) -- and in VR. You can X out of the ad at any time.
When people talk about today’s most popular social sharing websites, YouTube often gets left out of the conversation in favor of sites like Facebook and Twitter.
But don’t be fooled: YouTube has a lot going for it. Although Facebook might be the largest social networking site, YouTube has the second greatest reach after Facebook in terms of general usage. It’s also the second biggest search engine behind its parent company, Google.
And there are a ton of cool things you can do with YouTube that you might not know about, whether you use YouTube to watch videos, post them, or both. For example, did you know YouTube has its own virtual reality (VR) setting to view any video in 360 degrees? Or that you can create a YouTube time link that brings viewers to a specific moment in the video?
Mind-blowing stuff, people. To help you make the most out of the still very popular platform, we’ve put together a list of 20 of the lesser-known hacks, tips, and features YouTube has to offer.
YouTube Tricks, Hacks, and Features
- Turn any video into a GIF.
- Create a YouTube time link to start a video at certain points.
- See the written transcript of a video.
- Get found in search by uploading your own written transcript.
- Use YouTube to make a written transcript.
- Create, share, and collaborate on video playlists.
- Save videos to watch later.
- Create your own custom YouTube URL.
- Add an end screen or cards to promote similar content.
- Browse and download from YouTube’s free sound and music library.
- Add creative effects with YouTube Enhancements.
- Play videos in the background on mobile devices.
- Live stream videos to YouTube.
- Upload and watch videos in 360 degrees and VR.
- Watch for a new YouTube ads algorithm.
- Remove ads from YouTube videos for $10/month.
- Use Google Trends to explore popular YouTube search terms.
- Turn on a ‘safer’ YouTube for your kids.
- Clear your watch history.
- Learn about YouTube’s copyrights in a new way.

20 YouTube Tricks, Hacks, and Features You’ll Want to Know About
1. You can turn any YouTube video into a GIF using the URL.
Everyone loves GIFs, but knowing how to make them isn’t common knowledge. Well, it should be, because all it takes is a little YouTube URL trick.
To create a GIF from a YouTube video: Select a video to watch on YouTube and find the URL at the top of your browser. Add the word “gif” right before the domain name so it reads, “www.gifyoutube.com/[your-video-tag].”
This will bring you to gifs.com, with your video already uploaded and ready for editing. Here, you’ll find a menu of options to the left-hand side with a timeline bar along the bottom of your video. You can set the GIF duration, crop its frame, add captions, and more.
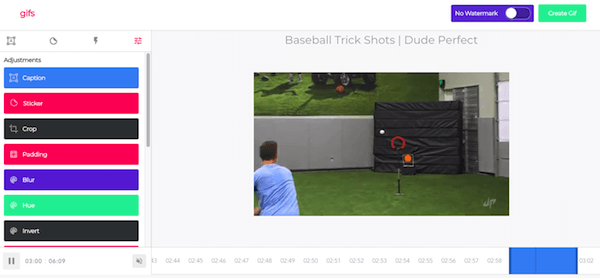
Click “Create GIF” on the top-right and it’ll prompt you for a GIF title and set of tags. Then click “Next,” and you have a handy landing page from which to share your newly minted GIF. Keep in mind you can only download this GIF to an offline file by signing up with gifs.com.
2. You can create a link that starts a YouTube video at a certain time.
Ever wanted to send someone a YouTube video, but point them to a specific moment? Let’s say you’re trying to recruit your friends to learn the dance in Justin Bieber’s “Sorry” music video with you.
Instead of sending your friends the general YouTube link and instructing them to fast-forward to the 0:50 minute mark, you can actually send them a specific YouTube time link that starts the video at whichever time you choose. Click here to see what I mean.
Alright, here’s how to do it:
To create a link that starts a YouTube video at a certain time: Open up the video and click “Share” to the far right of the video title. Then, in the window of options that appears, check the box next to “Start at:” and type in the time (in hours:minutes:seconds) you want. Alternatively, you can pause the video at the time you want it to start and that field will autofill.

After a few moments, you’ll see a tag add itself to the end of the generic YouTube link (in this case, ?t=50s). Simply copy that link and paste it wherever you’d like.
It’s worth noting that you can’t embed a video so it starts at a certain time; you can’t only link to it.
3. You can easily see the written transcripts of people’s videos.
Did you know YouTube automatically generates a written transcript for every single video uploaded to its website? That’s right — and anyone has access to that transcript unless the user manually hides it from viewers.
I can think of a number of different situations where video transcripts can come in handy. For example, maybe you want to write down a quote from a video, but the tedium of pausing-and-typing, pausing-and-typing would drive you up a wall. Or perhaps you need to find a specific section of a video, but don’t want to rewatch the whole thing to find it. With a transcript in hand, you can find information like this without doing it all by hand.
To see a video’s transcript: Open the video in YouTube and press the “More” tab underneath the video title. Choose “Transcript” from the drop-down menu.
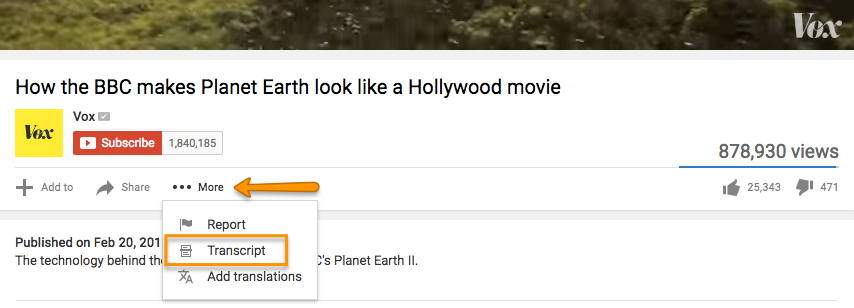
(If you aren’t seeing this option, it’s because the user chose to hide the transcript.)
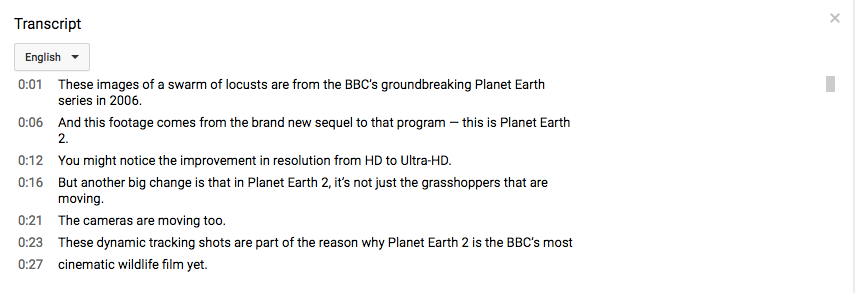
This transcript will appear as a new module in the same window. In many cases, the user who uploaded the video will not have gone back and manually polished the transcript, so it won’t be perfect. But it’ll certainly save you some time and pain.
4. You can help your video get found in search by editing or uploading a transcript.
Both YouTube and its parent company Google look at a number of factors when ranking videos in search to determine what your video is about, and your transcript is one of them. (An even bigger ranking factor is your video’s description, which is why Digital Marketing Consultant Ryan Stewart suggests that you actually paste your transcript right into the description box, too.)
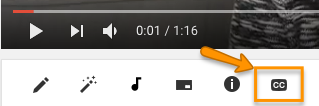
To add a transcript to your video: Open the video on YouTube, and you’ll see a row of icons just below the play button. Click the icon on the far right for “Subtitles/CC.” (CC stands for “Closed Captions.)
Set your language if you haven’t already. Then, you’ll then be prompted to choose among three different ways to add subtitles or closed captions to your video …
- Upload a pre-written text transcript or a timed subtitles file. (Learn more about the file types you can upload and more here.)
- Paste in a full transcript of the video, wherein subtitle timings will be set automatically.
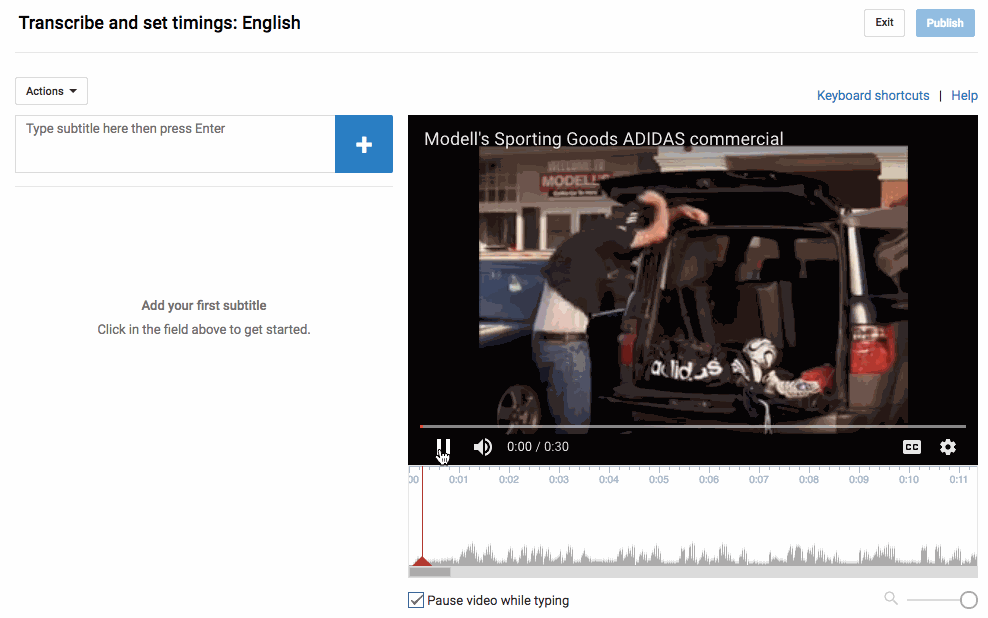
- Type them in as you watch the video.
The folks at YouTube have done some great things to make that third option (typing as you watch) as painless as possible. For example, if you check a box next to “Pause video while typing,” it’ll make the whole process a lot faster. Here’s a GIF showing that in action:
Learn more about optimizing your YouTube videos for search in the below video.
5. You can use YouTube to easily get free transcriptions of your videos and audio files.
This is the last one about transcripts, I promise — but I’ll bet you never thought about them this way. As you know from #3, YouTube automatically adds a transcript to every video. But if you’re looking for a one-off transcription of an audio or video file and don’t want to pay for a service, YouTube’s built-in captioning system isn’t a bad place to start. You can always clean it up later.
To get an automated transcription for a video: Simply upload your video to YouTube, open it on YouTube’s website, press the “More” tab underneath the video title, and choose “Transcript” from the drop-down menu. The transcript will appear as a new module in the same window. If you want to clean it up, follow the steps outlined in #3 for a user-friendly experience.
To get an automated transcription for an audio file: You’ll need to upload your audio recording to YouTube using a service like TunesToTube. It’ll take anywhere between 2–30 minutes for YouTube to upload it. Then, follow the instructions for getting an automated transcription for a video, outlined above.
6. You can create, share, and collaborate on video playlists.
Just like on your other favorite media sharing sites like Spotify and iTunes, you can create a “playlist” on YouTube — which is really just a place to store and organize the videos (your own and others’). You can keep playlists private, make them public, or even share them directly with others.
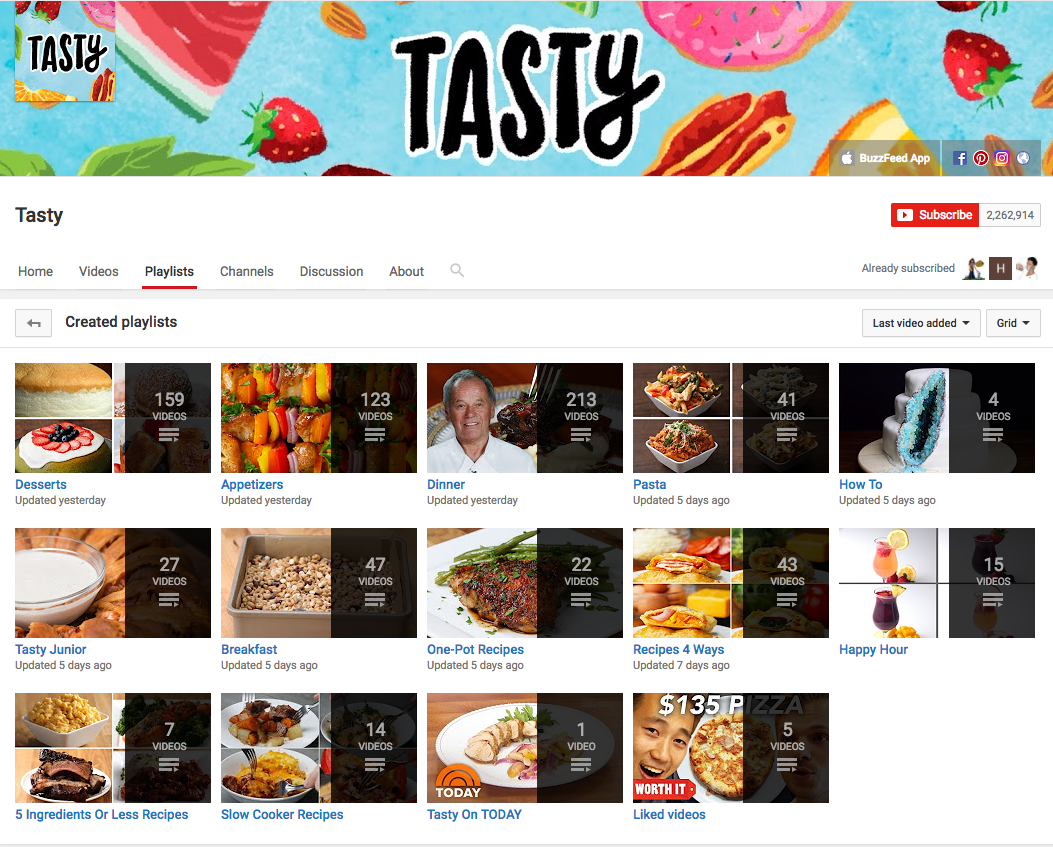
Playlists are useful for many different types of users, from an individual collecting cooking videos for their upcoming dinner party to a brand that’s segmenting its YouTube video content by topic. For example, Tasty’s YouTube playlists break up recipes by meal type, making it easier for people to browse and find what they’re looking for:

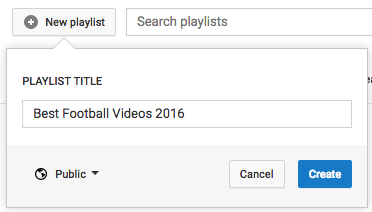
To create a playlist on desktop: Go to your Playlists page by clicking here or clicking your account icon in the top right, choosing “Creator Studio,” clicking “Video Manager” on the left, and choosing “Playlists.” Then, click “New Playlist” on the top right and choose whether you’d like to keep it private or make it public.
To create a playlist on mobile: Click here for instructions explaining how to create new playlists using your iOS or Android mobile devices.
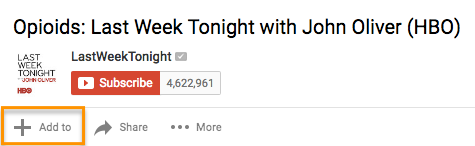
To add a video to a playlist: If you’re adding a video to a playlist while you’re watching it, click the “Add to” icon below the video title and check the box next to the playlist to which you’d like to add it.
If you want to add a video to a playlist right from your Playlists page, simply click “Add Video” and either paste in a video URL, choose a video from your uploads, or search for a video on YouTube. Once you find the video you want to add, select the “Add to” menu from that video and add it to the playlist.
Your friends can contribute to your playlists, too. All you have to do is turn on the ability to collaborate on playlists. Once you turn it on, anyone you share a playlist link with can add videos to that playlist. (They can also remove any videos they’ve added, too.)
To add friends to a playlist: Go to your Playlists page again and open the playlist you want to collaborate on. Click “Playlist Settings” and choose the “Collaborate” tag. Toggle on the setting that allows collaborators to add videos to the playlist, and from there, you can send them a link where they can add videos to the playlist.
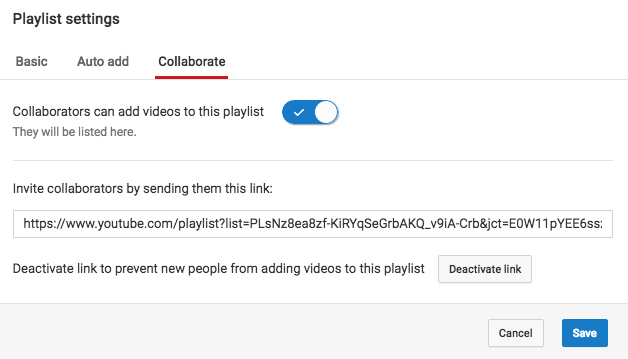
Once your friend’s been invited to a playlist, they’ll be able to add new videos to it and remove videos they’ve added in the past. They just have to follow some on-screen instructions first to confirm they want to be a contributor and to save the playlist to their own account.
When you add a video to a playlist you’re collaborating on, your name will appear next to the video in the playlist, and everyone who’s been invited to collaborate on that playlist will get a notification that a new video has been added.
(To learn more about how to manage contributors, stop accepting contributions to a playlist, and so on, read this YouTube Support page.)
7. You can save videos to watch later.
Ever seen YouTube videos you wished you could bookmark for later? Maybe you aren’t able to turn the sound on at the moment, or perhaps you just don’t have time to watch it. Well, YouTube took a page out of Facebook’s … book … by adding something very similar to Facebook’s “Save for Later” feature. On YouTube, you can save videos to a “Watch Later” playlist to access whenever you want.
The “Watch Later” playlist operates just like a normal playlist, so the instructions are identical to the previous step (except you can’t invite others to collaborate on your “Watch Later” playlist).
To add a video to your “Watch Later” playlist: Open the video on YouTube and click the “Add to” icon below the video title and check the box next to the playlist you’d like to add it to, just like you did in the previous step. The steps are very similar on mobile, but click here if you want the full instructions from YouTube’s Support page.
To access those videos: Simply go to your YouTube homepage and choose “Watch Later” from the menu on the upper left-hand side of your screen.
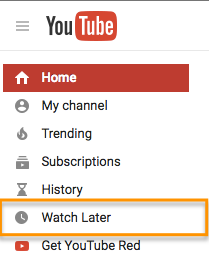
From there, you can watch the videos you were saving, as well as easily remove videos from that list that you’ve already watched.
8. You can create your own custom YouTube URL.
Want to give people an easy-to-remember web address to get to your YouTube channel? You can actually create a custom URL, which you can base on things like your display name, your YouTube username, any current vanity URLs that you have, or the name of your linked website. HubSpot’s, for example, is https://www.youtube.com/hubspot.
Important Note: Before you do this, make sure you’re positive this is the custom URL you want — because once it’s approved, you can’t request to change it, nor can you transfer it to someone else. Keep in mind that it’ll be linked to both your YouTube channel and your Google+ identity, too.
Unfortunately, not everyone’s eligible for a custom URL. To get one, you have to have 100 or more subscribers, be at least 30 days old, have an uploaded photo as your channel icon, and have uploaded channel art. If that sounds like you, keep reading.
To claim your custom URL: Open up your YouTube account settings and click “Advanced” in your name section.
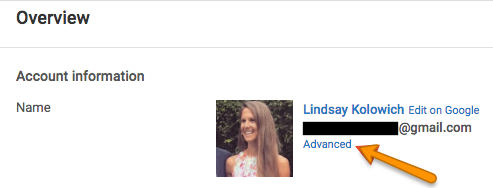
If you’re eligible for a custom URL, you’ll be prompted to claim yours by clicking…
COMMENTS