You can do this only if you know your audience well. To optimize your Facebook ads and monitor the results, you need to add the pixel to the thank-you page associated with your squeeze page. If you’re adding the pixel code in Leadpages, for example, click Lead Page Options. Note: To build Facebook custom audiences for retargeting, you also need to add your pixel to the squeeze page and every web page you own. Then click on Create Custom Conversion. Click Create Custom Conversion. #5: Choose Your Ad Targeting Options Before you start creating your ad, you need to know who you want to see it. Next choose your ad set settings. The first of these is audience targeting. Set up specific targeting options in Facebook Ads Manager.
Do you want to generate more leads from Facebook?
Interested in using Facebook ads to promote a lead magnet?
Facebook ads are a great way to build a database of people who are interested in what you offer, because the reach and targeting options are exceptional.
In this article, you’ll discover how to set up a lead generation system with Facebook ads.
#1: Get to Know Your Ideal Customers
Facebook is a crowded space and you have only a split second to get someone’s attention. You need to craft a message that will stop your target audience from scrolling past.
You can do this only if you know your audience well. Find out what matters to them about the problem you can help solve, how they feel about it, how they feel after solving it, what questions they have, and the language they use to talk about it.
Gather this information from conversations with customers (or prospects) and from listening to conversations in relevant Facebook or LinkedIn groups, online forums, and on Twitter. This information will help you create more effective ads and landing pages.
#2: Create a Freebie Your Customers Will Love
Giving away something valuable to your target audience will help you attract your ideal customers in a non-salesy way. Offer a free gift that will get people one step closer to solving their problem (or achieving their dream). This freebie is often known as a “lead magnet.”
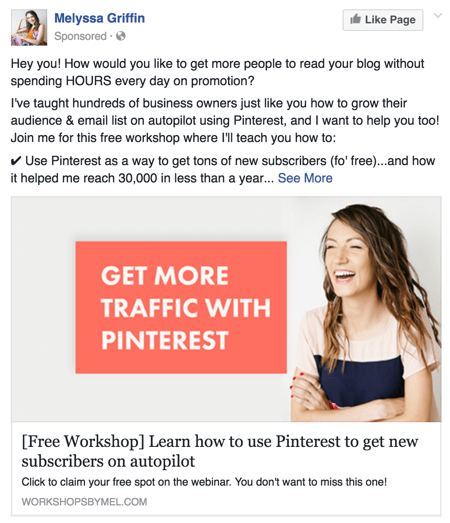
You want people to accept your gift and actually use it. That way they’ll quickly see you as an expert who offers value and start to trust you. The best freebies are quick and easy to consume (a short checklist, template, or video) and focus on helping with one small part of the problem or dream, or an introduction to how you work.
They’re also designed to make a great first impression and relate to the product or service you offer. (This is the first step in a journey that leads to you offering your paid product or service.)
If you’re not sure what to offer, collect the most common questions you hear, ask your audience on social media what they would find helpful, or have real-life conversations. It might be tempting to offer a generic “10 Top Tips,” but this is a real chance for you to stand out from the crowd.
#3: Set Up a Squeeze Page and Thank-you Page on Your Site
You need to get your freebie out to as many people as possible. To do this with Facebook ads, you’ll need to host your offer on a web page that allows people to opt in and give you their email address for delivery.
The best type of web page for this is called a “squeeze page,” because it squeezes the visitor to make a decision either to opt in or leave. It has none of the usual navigation associated with a page on your website.
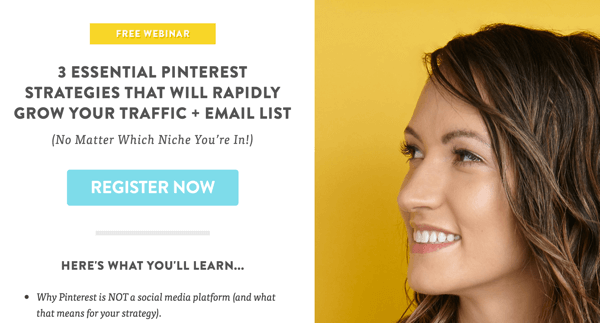
There are many software options available to help you build these pages quickly and easily, including Leadpages, ONTRAPORT, Instapage, ClickFunnels, and the Thrive Themes plugin. These tools have tried and tested templates and will seamlessly integrate with your email marketing provider.
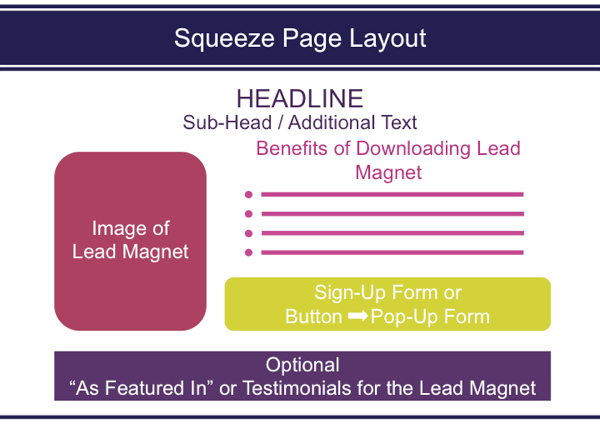
A simple page often provides the best results. You want to clearly convey the benefits of your freebie to visitors. The more you talk about how the results will make people feel, the more likely they’ll say yes and opt in. Here’s a standard layout for a squeeze page.
Remember to include a privacy statement explaining that you’ll keep their data safe and not spam them. Also provide a link to your terms and conditions. Don’t add pop-ups or any tricks designed to stop visitors from leaving the page; your Facebook ads won’t run if you do this.
You’ll also need to create a thank-you page to serve visitors who opt in to receive your freebie.
#4: Add the Facebook Pixel to Your Squeeze and Thank-you Pages
The Facebook pixel is a piece of code (called a “cookie”) that Facebook provides. Once it’s in place on your website, you can track actions that take place on your web pages and link them back to your Facebook ad accounts.
In your Facebook Ads Manager, navigate to Pixels under Assets.
Then click Actions and select View Pixel Code.
The string of code you see is your pixel; you get one per ad account.
To optimize your Facebook ads and monitor the results, you need to add the pixel to the thank-you page associated with your squeeze page. Copy the pixel code by clicking anywhere in the box.
Next you need to paste the code into the header area of your thank-you page (between the head tags). If you’re adding the pixel code in Leadpages, for example, click Lead Page Options.
Click Tracking Codes in the pop-up box.
Then add your Facebook pixel code.
Note: To build Facebook custom audiences for retargeting, you also need to add your pixel to the squeeze page and every web page you own.
Adding the pixel to the thank-you page tells Facebook that you want people who see your ads to click on the squeeze page, provide their email address, and then go to your thank-you page.
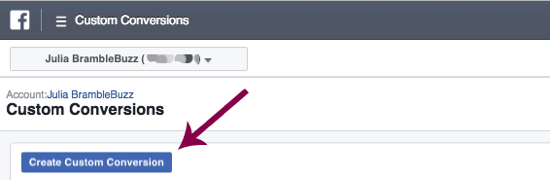
To give Facebook the specific URL of your thank-you page, you need to create a custom conversion. (A conversion is simply someone taking action on your website.) Navigate to Custom Conversions in your Facebook Ads Manager.
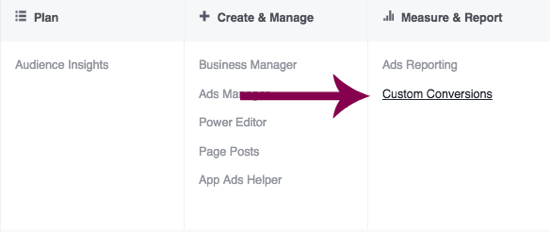
Then click on Create Custom Conversion.
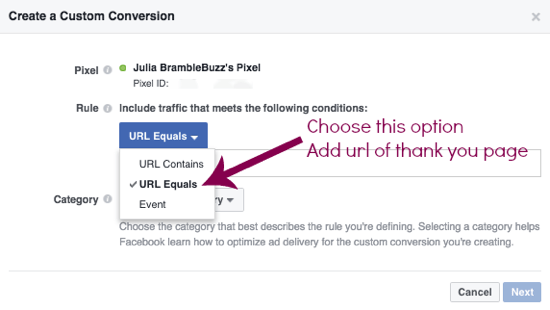
Add the URL of your thank-you page and assign a category for this conversion (this will be for your filing purposes). Then give the conversion a name that makes sense to you and you’re done!
Your new custom conversion might have a red indicator next to it at first. If so, just fire the pixel by navigating to the thank-you page and refreshing a couple of times. Do the same to the custom conversion page and you’ll see that your custom conversion indicator is now green and ready to go!
Once Facebook knows what you want your ads to achieve, they’ll help you optimize for that result. They’ll also record how many people go through that process for each ad you run, giving you an average cost per opt-in. This information is invaluable when it comes to testing and optimizing your ads.
#5: Choose Your Ad Targeting Options
Before you start creating your ad, you need to know who you want to see it. When choosing audiences to target, the goal should be to define your audience as distinctly as possible from the…
COMMENTS