![How to Make an Animated GIF in Photoshop [Tutorial]](http://www.marketinghub.today/wp-content/uploads/2017/07/how-to-make-an-animated-gif-in-photoshop-tutorial.jpg "How to Make an Animated GIF in Photoshop [Tutorial]")
How to Create an Animated GIF in Photoshop Here's an example of an animated GIF you might make using this tutorial: Alright, let's get started. Step 1: Upload your images to Photoshop. If you already have images created ... Then, click OK. Photoshop will then create a separate layer for each image you've selected. Create each frame of the animated GIF as a different Photoshop layer. Here's what it looks like: Step 3: In the Timeline window, click "Create Frame Animation." Now, your Timeline should look something like this: Step 4: Create a new layer for each new frame. Step 5: Open the same menu icon on the right, and choose "Make Frames From Layers." This will make each layer a frame of your GIF. To do this, click the time below each frame and choose how long you'd like it to appear.

If you’ve spent any time on the internet at all, you’ve probably come in contact with an animated GIF. It’s an image file that allows you to feature animated images, which makes it seem like the image is moving. Think of them as a hybrid between a still image and a video.
Why are GIFs great additions to your marketing? They’re easy to consume, provide a new way to capture your viewers’ attention, and can have a serious emotional impact. And since content that makes us feel something encourages us to share, these tiny animations are worth experimenting with.
The best part about GIFs is that they aren’t too hard to make. If you have access to Photoshop and a few minutes to spare, you can create an animated GIF in no time.
In the following tutorial on making animated GIFs, I’m using the Creative Cloud 2015 version of Photoshop, but the steps should be similar in other versions.
P.S. – Download these free visual content templates to help you create more engaging social media images.
How to Create an Animated GIF in Photoshop
Here’s an example of an animated GIF you might make using this tutorial:
Alright, let’s get started.
Step 1: Upload your images to Photoshop.
If you already have images created …
Gather the images you want in a separate folder. To upload them into Photoshop, click File > Scripts > Load Files Into Stack.
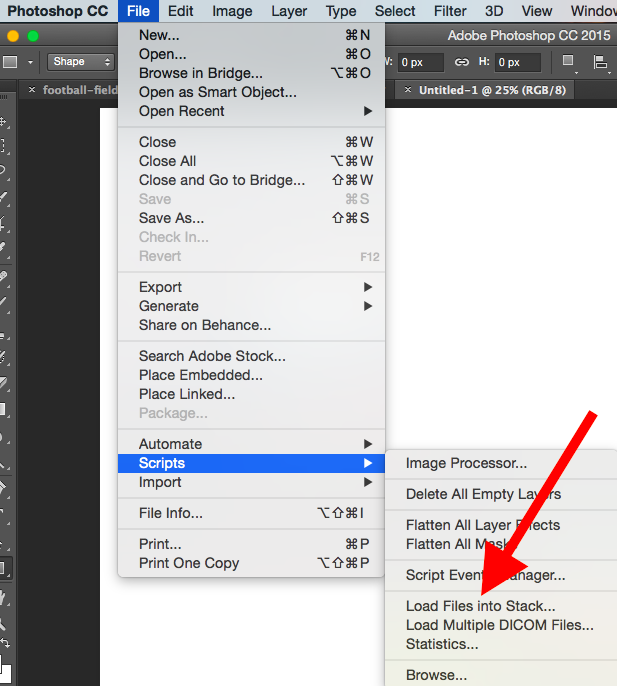
Then, select Browse, and choose which files you’d like to use in your GIF. Then, click OK.
Photoshop will then create a separate layer for each image you’ve selected. Once you’ve done that, skip to step two.
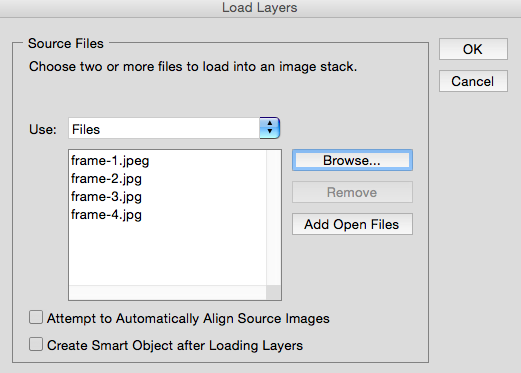
If you don’t already have the series of images created …
Create each frame of the animated GIF as a different Photoshop layer. To add a new layer, chose Layer > New > Layer.
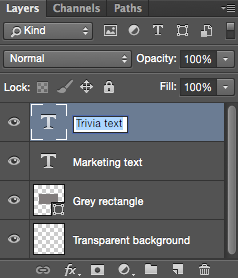
Be sure to name your layers so you can keep track of them easily when you make your GIF. To name a layer, go to the Layer panel on the bottom right of your screen, double-click on the default layer name, and type in the name you want to change it to. Press Enter when you’re finished.
Once you have your layers in there and you’ve named them all, you’re ready for step two.
Pro Tip: If you want to combine layers so they appear in a single frame in your GIF, turn visibility on for the layers you want to merge (by clicking on the “eye” to the left of each layer name so only the eyes for the layers you want to merge are open). Next, press Shift + Command + Option + E (Mac) or Shift + Ctrl + Alt + E (Windows). Photoshop will create a new layer containing the merged content, which you should also rename.
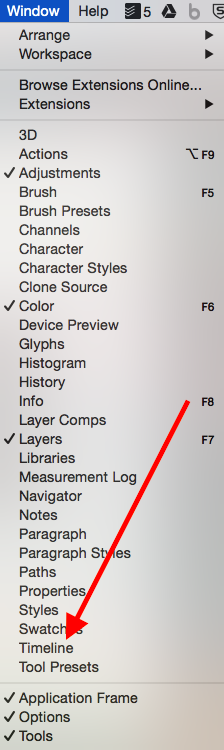
Step 2: Open up the Timeline window.
To open Timeline, go to the top navigation, choose Window > Timeline. The Timeline will let you turn different layers on and off for different periods of time, thereby turning your static image into a GIF.
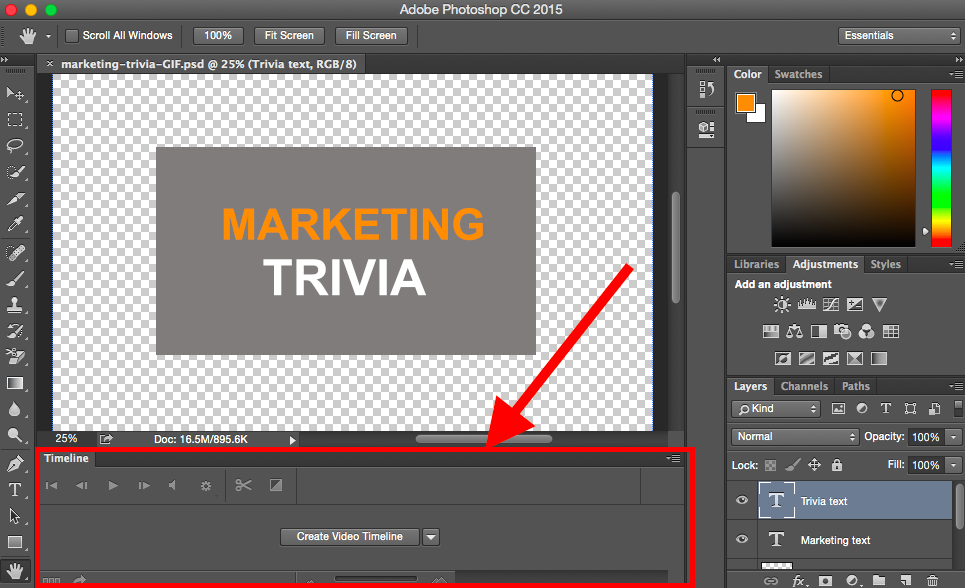
The Timeline window will appear at the bottom of your screen. Here’s what it looks like:
COMMENTS